Sunday, 26 April 2020

What I believe to be my top 10 best process images

Number 1

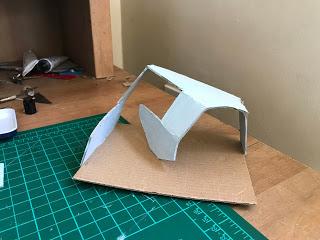
This was the first ever process image I took, the model is not perfect, the image is not perfect, therefore, it is a perfect summary of  the beginning of this whole process.

Number 2

A somewhat improved version of my first model, this is my second process image.

Number 3

Experimenting with shapes and lighting, I seem to have started to feel more confortable with model making, however, my understanding of materials is still not fully developed as seen by the flooring of the model.

Number 4

Finally, gaining a deeper understanding of  model making materials, I learnt how to make a clean, minimalistic design.

Number 5

Finally, going back to basics with a renowned understanding of shape and material, ready to move on to the next stage of the learning process. 
Number 6

Creating a rendered image by using baisc photoshop skills.
Number 7

Improving the basic photoshop skills to make the render look more realistic.
Number 8

Using digital programs to make shapes and spaces.
Number 9

Creating more organic shapes with the new 3D program.
Number 10


Adding in textures and context to 3D renders.


3 minute presentation


Saturday, 25 April 2020

Closer to home

In my spatial exploration, I was drawn to create designs that embody the theme of openness. I believe that good architecture must be a reflection of its environment and must not take away from the experience created by its respective site. I chose to explore the concept of openness through my process models. I understood that a building with a closer conection to the site created a more homely atmosphere, hence, I aimed to implement this through the use of open spaces. It was through the creation and experimentation of different froms; both geometric and organic, that I was able to  appreciate the many ways in which "openness" can be achieved when practicing model making.

Monday, 20 April 2020

Photoshopping my ideal room images

1st render

So I decided to edit a few textures into my ideal rooms, for this one I went crazy with it and even tiled the ceiling because, why not?

2nd render

For this one I layed off the crazy colours and only added wooden floor as a texture, as well as some furniture and a person for scaling purposes.

3rd render
In this render, I inserted the space into a beach-like setting, I did forget about the fact that part of the structure was made of mesh, so you can imagine how I felt knowing that most of my time would be spent using the eraser tool with a 1 pixel brush size. 100% would not do again. 

Friday, 17 April 2020

Ideal room models

Ideal room #1


Wanting to experiment with cardboard I turned to different types of cardboards, in this model I used a thick piece of cardboard as the floor and a thinner piece of cardboard acquired from your local toilet paper roll for the roof.


When making the shape I found out that I quite liked rooms that aren't the standard shapes, so with the opera house as a precedent I created this tropical-ly type of room, with vey natural colours and textures (except for the mesh that I added for a better aesthetic effect and contrast)
Here's a picture of this room as I experimented with the lighting.

And here's another, because ya can never get enough of these pinterest looking images, am I right or am I right?

Ideal room #2


This room has a similar shape to the first one but it has a different atmosphere due to changing materials, rather than making it with cardboard, I used tracing paper and mesh (again) to create a more futuristic like room (I would have shown progression pictures, however, there weren't many steps to creating this one)
Here’s the room in black and white without the person because we take this quarantine seriously #stayathome.

Here it is in a much warmer light style.

Ideal room #3


This room takes a much more geometric form as I wanted to explore different types of ideas, and although it is much more similar to standard rooms, it is still an open space which is something that I wanted to keep constant in all my "ideal room" models, as that openness is what makes it more ideal for me.

Here is the picture in black and white, I really like the effect that the open roof had on the room through its shadows.
Here is a clearer image of what the roof looks like from the top.
Lastly here is an image of the whole space of the room, you might notice that the original colours of the wall are actually blue-ish, don’t know where I got that from, but I’m glad I stuck with it since it makes the space more unique.


Tuesday, 14 April 2020

Week 7 Initals MCV

Gimme an M!
Gimme a C! (that looks liked a flipped D through no fault of mine)
Gimme a V! What do we have?
The intials of someone who doesn't remember the last time they had a good sleep.

For  my initials, I used M, C and V for my first, middle and last name, I actually have two last names so I thought it'd be kinda cool to add another letter until I realised that both my last names start with V.

For this appearance, I chose the bamboo light semi-gloss, concrete tile and stainless steel - brushed linear long appearance, before this I had been experimenting with a few darker colours and materials, but none of them seemed to be noteworthy or attractive to me so I continued to experiment with lighter material finishes.

For this appearance, I chose the jade (white/green) finish for the outside, pine finish for the front and back of the shape, and mirror for the inside of the shape, again sticking to the light colour palatte that I find most aesthetic.


This here is a prespective I decided to make to show what this would look like in an environment-y setting. (or maybe it was an excuse to go on a photoshop spree? we will never know.

Wednesday, 8 April 2020

Week 5 1:10 paper + cradboard model

Paper Model


In my first paper model I have found that the material is very frail and doesn't stand up-right in the way that I wanted to. Additionally, I found it somewhat difficult to create a  model at a 1:10 scale as it was too large for my taste. As you can probably tell I didn't show the full scale for this one simply because it's suze was just too much for me to handle.


Cardboard Model


I made this model at a 1:20 scale as I found it much easier to work at a smaller scale, I also enjoyed that the materiality was much more stiff and wouldn't collapse as easily as the paper model. From here on out I'm going to continue making models at this scale as it seems to be ideal for the tasks ahead.